Add Outline SDK to your mobile app
This document outlines how to integrate the Outline SDK into your mobile
applications, focusing on the MobileProxy library for simplified local proxy
management.
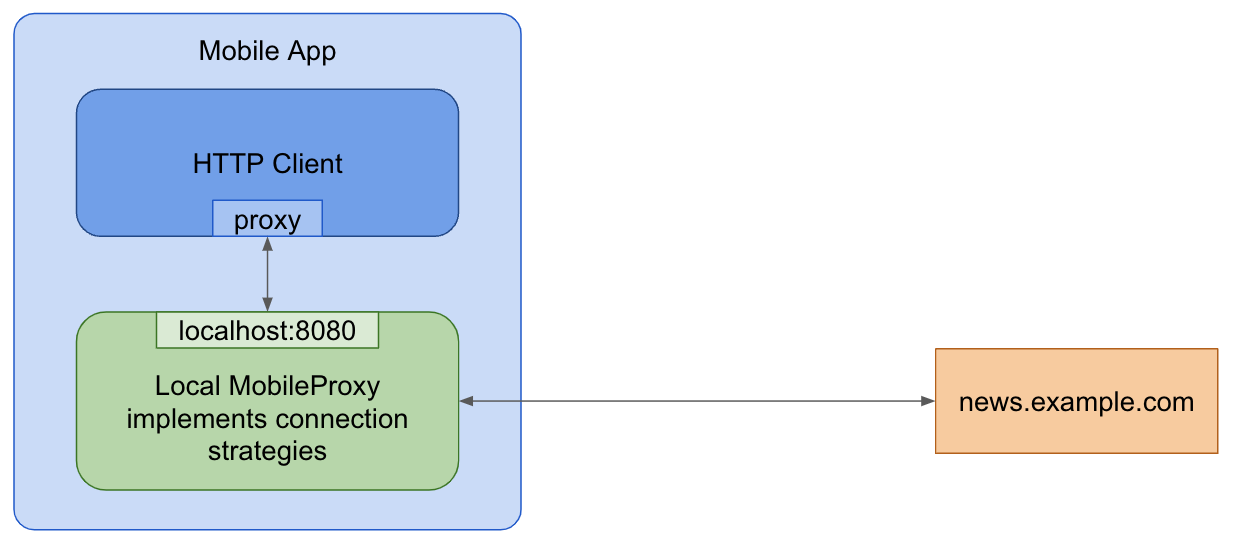
MobileProxy is a Go-based library designed to streamline the integration of
proxy functionalities into mobile apps. It utilizes Go
Mobile to generate mobile libraries, enabling you
to configure your app's networking libraries to route traffic through a local
proxy.
App without MobileProxy

App with MobileProxy
Step 1: Building MobileProxy mobile libraries
Use gomobile to compile the Go code into libraries for Android and iOS.
-
Clone the Outline SDK repository:
git clone https://github.com/OutlineFoundation/outline-sdk.git
cd outline-sdk/x -
Build the Go Mobile binaries with
go build:go build -o "$(pwd)/out/" golang.org/x/mobile/cmd/gomobile golang.org/x/mobile/cmd/gobindAdding Psiphon Support
You can add support to use the Psiphon network by following these extra steps:
-
Contact the Psiphon team to obtain a config that gives you access to their network. This may require a contract.
-
Add the received Psiphon config to the
fallbacksection of yourSmartDialerconfig. -
Build the Mobile Proxy using the
-tags psiphonflag:go build -tags psiphon -o "$(pwd)/out/" golang.org/x/mobile/cmd/gomobile golang.org/x/mobile/cmd/gobind -
Register Psiphon with the Smart dialer in your native code.
The
-tags psiphonflag is required because the Psiphon codebase is licensed under the GPL, which can impose license restrictions on your own code. You may want to consider obtaining a special license from them. -
-
Generate mobile libraries and add them to your project:
- Android
- iOS
PATH="$(pwd)/out:$PATH" gomobile bind -ldflags='-s -w' -target=android -androidapi=21 -o "$(pwd)/out/mobileproxy.aar" github.com/OutlineFoundation/outline-sdk/x/mobileproxy
In Android Studio select File > Import Project… to import the generated out/mobileproxy.aar bundle. For more help see Go Mobile's Building and deploying to Android.
PATH="$(pwd)/out:$PATH" gomobile bind -ldflags='-s -w' -target=ios -iosversion=11.0 -o "$(pwd)/out/mobileproxy.xcframework" github.com/OutlineFoundation/outline-sdk/x/mobileproxy
Drag the out/mobileproxy.xcframework bundle to the Xcode project. For
more help see Go Mobile's Building and deploying to
iOS.
Step 2: Run the MobileProxy
- Initialize and start the
MobileProxylocal proxy within your app's runtime. You can use either a static transport configuration or the Smart Proxy for dynamic strategy selection.
- Static transport configuration: Use the
RunProxyfunction with a local address and transport configuration.
- Android
- iOS
import mobileproxy.*

val dialer = StreamDialer("split:3")

// Use port zero to let the system pick an open port for you.
val proxy = Mobileproxy.runProxy("localhost:0", dialer)
// Configure your networking library using proxy.host() and proxy.port() or proxy.address().
// ...
// Stop running the proxy.
proxy.stop()
import Mobileproxy

let dialer = MobileproxyStreamDialer("split:3")

// Use port zero to let the system pick an open port for you.
let proxy = MobileproxyRunProxy("localhost:0", dialer)
// Configure your networking library using proxy.host() and proxy.port() or proxy.address().
// ...
// Stop running the proxy.
proxy.stop()
- Smart Proxy: The Smart Proxy dynamically selects DNS and TLS strategies based on specified test domains. You need to specify the configuration strategy in YAML format (example).
- Android
- iOS
val testDomains = Mobileproxy.newListFromLines("www.youtube.com\ni.ytimg.com")
val strategiesConfig = "..."  // Config YAML.
val dialer = Mobileproxy.newSmartStreamDialer(testDomains, strategiesConfig, Mobileproxy.newStderrLogWriter())

// Use port zero to let the system pick an open port for you.
val proxy = Mobileproxy.runProxy("localhost:0", dialer)
// Configure your networking library using proxy.host() and proxy.port() or proxy.address().
// ...
// Stop running the proxy.
proxy.stop()
import Mobileproxy

var dialerError: NSError?
let testDomains = MobileproxyNewListFromLines("www.youtube.com\ni.ytimg.com")
let strategiesConfig = "..."  // Config YAML.
let dialer = MobileproxyNewSmartStreamDialer(
    testDomains,
    strategiesConfig,
    MobileproxyNewStderrLogWriter(),
    &dialerError
)

var proxyError: NSError?
// Use port zero to let the system pick an open port for you.
MobileproxyRunProxy("localhost:0", dialer, &proxyError)
// Configure your networking library using proxy.host() and proxy.port() or proxy.address().
// ...
// Stop running the proxy.
proxy.stop()
- Then, if you are using psiphon, register Psiphon with your Smart Dialer options in your native code.
- Android
- iOS
import mobileproxy.Mobileproxy
import psiphon.Psiphon

// ...

val testDomains = Mobileproxy.newListFromLines("www.google.com\ni.ytimg.com")
// You can get a Psiphon config from the Psiphon team at sponsor@psiphon.ca.
val psiphonConfig = "<YOUR_PSIPHON_CONFIG_JSON_HERE>"
val config = """
dns:
  - {system: {}}
tls:
  - ""
fallback:
  - {"psiphon": \(psiphonConfig)}
"""

val options = Mobileproxy.newSmartDialerOptions(testDomains, config)

// Register Psiphon
Psiphon.registerConfig(options, "psiphon")

try {
    // Create the dialer
    val dialer = options.newStreamDialer()
    // ... use the dialer
} catch (e: Exception) {
    // Handle error
}
import Mobileproxy
import Psiphon

// ...

let testDomains = MobileproxyNewListFromLines("www.google.com\ni.ytimg.com")
// You can get a Psiphon config from the Psiphon team at sponsor@psiphon.ca.
let psiphonConfig = "<YOUR_PSIPHON_CONFIG_JSON_HERE>"
let config = """
dns:
  - {system: {}}
tls:
  - ""
fallback:
  - {"psiphon": \(psiphonConfig)}
"""

let options = MobileproxyNewSmartDialerOptions(testDomains, config)

// Register Psiphon
PsiphonRegisterConfig(options, "psiphon")

do {
    // Create the dialer
    let dialer = try options.newStreamDialer()
    // ... use the dialer
} catch {
    // Handle error
}
Step 3: Configure HTTP clients and networking libraries
Configure your networking libraries to use the local proxy address and port.
- Dart/Flutter HttpClient
- OkHttp (Android)
- JVM (Java, Kotlin)
- Android Web View
- iOS Web View
Set the proxy with
HttpClient.findProxy.
HttpClient client = HttpClient();
client.findProxy = (Uri uri) {
  return "PROXY " + proxy.address();
};
Set the proxy with
OkHttpClient.Builder.proxy.
val proxyConfig = Proxy(Proxy.Type.HTTP, InetSocketAddress(proxy.host(), proxy.port()))
val client = OkHttpClient.Builder().proxy(proxyConfig).build()
Configure the proxy to use with system properties:
System.setProperty("http.proxyHost", proxy.host())
System.setProperty("http.proxyPort", String.valueOf(proxy.port()))
System.setProperty("https.proxyHost", proxy.host())
System.setProperty("https.proxyPort", String.valueOf(proxy.port()))
Apply a proxy configuration to all the web views in your application with
the
androidx.webview
library:
ProxyController.getInstance()
    .setProxyOverride(
        ProxyConfig.Builder()
            .addProxyRule(this.proxy!!.address())
            .build(),
        {}, // execution context for the following callback - do anything needed here once the proxy is applied, like refreshing web views
        {} // callback to be called once the ProxyConfig is applied
    )
As of iOS 17, you can add a proxy configuration to a WKWebView using its
WKWebsiteDataStore
property:
let configuration = WKWebViewConfiguration()
let endpoint = NWEndpoint.hostPort(host: NWEndpoint.Host(proxyHost), port: NWEndpoint.Port(proxyPort)!)
let proxyConfig = ProxyConfiguration.init(httpCONNECTProxy: endpoint)
let websiteDataStore = WKWebsiteDataStore.default()
websiteDataStore.proxyConfigurations = [proxyConfig]
let webview = WKWebView(configuration: configuration)
Advanced: Generate a custom mobile library
For advanced use cases, you can generate your own mobile libraries:
- Create a Go library: Develop a Go package wrapping the required SDK functionalities.
- Generate mobile libraries: Use
gomobile bindto produce Android Archives (AAR) and Apple Frameworks. Examples: - Integrate into your app: Add the generated library to your mobile application.
Use gomobile bind on your custom package, not directly on the SDK
packages.