Outline SDK zu Ihrer mobilen App hinzufügen
In diesem Dokument wird beschrieben, wie Sie das Outline SDK in Ihre mobilen Apps einbinden können. Der Fokus liegt dabei auf der MobileProxy-Programmbibliothek für die vereinfachte Verwaltung des lokalen Proxys.
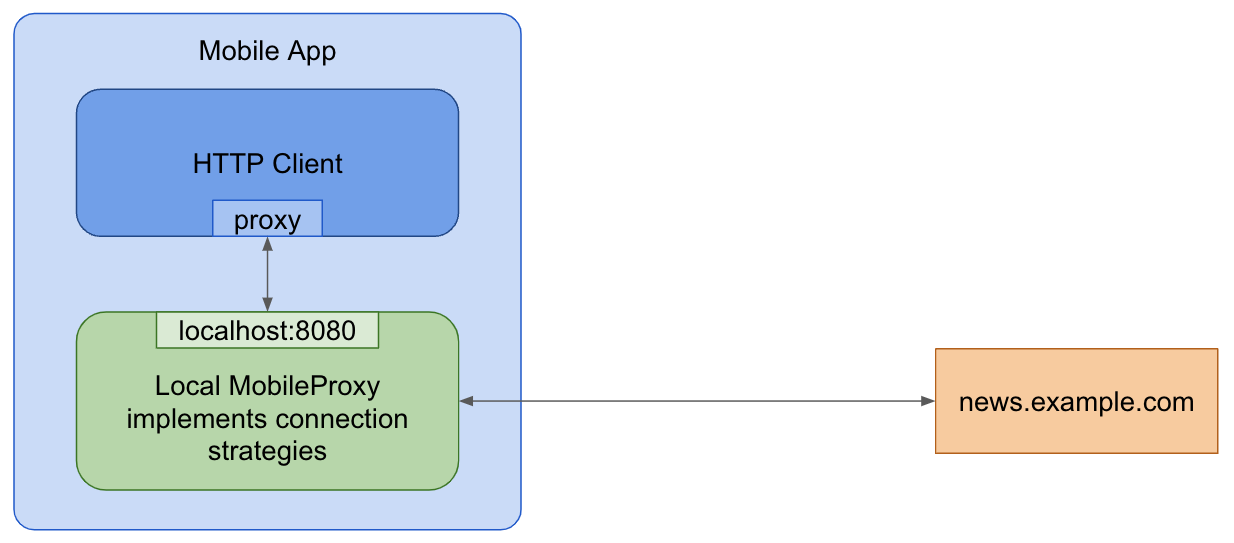
MobileProxy ist eine Go-basierte Programmbibliothek, die entwickelt wurde, um die Einbindung von Proxy-Funktionen in mobile Apps zu vereinfachen. Sie nutzt Go Mobile, um Bibliotheken für mobile Apps zu erstellen. Sie können dadurch die Netzwerk-Bibliotheken Ihrer App so konfigurieren, dass der Datenverkehr über einen lokalen Proxy geleitet wird.
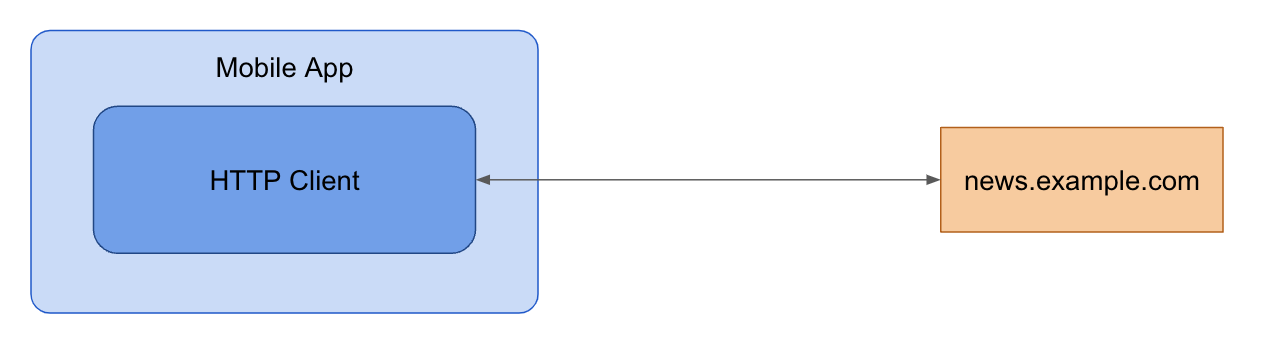
App ohne MobileProxy
App mit MobileProxy
Schritt 1: MobileProxy-Bibliotheken erstellen
Sie können gomobile verwenden, um den Go-Code in Programmbibliotheken für Android und iOS zu kompilieren.
- Klonen Sie das Outline SDK Repository:
git clone https://github.com/OutlineFoundation/outline-sdk.git
cd outline-sdk/x
- Erstellen Sie die Go Mobile-Binärprogramme mit
go build:
go build -o "$(pwd)/out/" golang.org/x/mobile/cmd/gomobile golang.org/x/mobile/cmd/gobind
Psiphon-Support hinzufügen
Sie können Support zur Nutzung des Psiphon-Netzwerks hinzufügen, wenn Sie diese zusätzlichen Schritte ausführen:
-
Wenden Sie sich an das Psiphon-Team, um eine Konfiguration zu erhalten, die Ihnen Zugriff auf deren Netzwerk ermöglicht. Dazu kann ein Vertrag erforderlich sein.
-
Fügen Sie die erhaltene Psiphon-Konfiguration in den
fallback-Abschnitt IhrerSmartDialer-Konfiguration ein. -
Erstellen Sie den MobileProxy und verwenden Sie dazu das
-tags psiphon-Flag:
go build -tags psiphon -o "$(pwd)/out/" golang.org/x/mobile/cmd/gomobile golang.org/x/mobile/cmd/gobind
Das -tags psiphon-Flag ist erforderlich, weil die Psiphon-Codebasis unter der GPL lizenziert ist, was zu Einschränkungen der Lizenz für Ihren eigenen Code führen kann. Sie sollten erwägen, eine spezielle Lizenz zu kaufen.
- Erstellen Sie Bibliotheken für mobile Apps und fügen Sie diese zu Ihrem Projekt hinzu:
- Android
- iOS
PATH="$(pwd)/out:$PATH" gomobile bind -ldflags='-s -w' -target=android -androidapi=21 -o "$(pwd)/out/mobileproxy.aar" github.com/OutlineFoundation/outline-sdk/x/mobileproxy
Wählen Sie in Android Studio Datei > Projekt importieren…, um das erstellte out/mobileproxy.aar-Bundle zu importieren. Weitere Hilfe finden Sie im Bereich zu Entwicklung und Bereitstellung für Android von Go Mobile.
PATH="$(pwd)/out:$PATH" gomobile bind -ldflags='-s -w' -target=ios -iosversion=11.0 -o "$(pwd)/out/mobileproxy.xcframework" github.com/OutlineFoundation/outline-sdk/x/mobileproxy
Ziehen Sie das out/mobileproxy.xcframework-Bundle in das Xcode-Projekt. Weitere Hilfe finden Sie im Bereich zu Entwicklung und Bereitstellung für iOS.
Schritt 2: MobileProxy ausführen
Initialisieren und starten Sie den lokalen Proxy MobileProxy während der Laufzeit Ihrer App.
Sie können entweder eine statische Transportkonfiguration oder den Smart Proxy für eine dynamische Strategieauswahl verwenden.
- Statische Transportkonfiguration: Verwenden Sie die
RunProxy-Funktion mit einer lokalen Adresse und Transportkonfiguration.
- Android
- iOS
import mobileproxy.*

val dialer = StreamDialer("split:3")

// Use port zero to let the system pick an open port for you.
val proxy = Mobileproxy.runProxy("localhost:0", dialer)
// Configure your networking library using proxy.host() and proxy.port() or proxy.address().
// ...
// Stop running the proxy.
proxy.stop()
import Mobileproxy

let dialer = MobileproxyStreamDialer("split:3")

// Use port zero to let the system pick an open port for you.
let proxy = MobileproxyRunProxy("localhost:0", dialer)
// Configure your networking library using proxy.host() and proxy.port() or proxy.address().
// ...
// Stop running the proxy.
proxy.stop()
- Smart Proxy: Der Smart Proxy wählt dynamisch DNS- und TLS-Strategien anhand der angegebenen Testdomains aus. Sie müssen die Konfigurationsstrategie im YAMLFormat festlegen (Beispiel).
- Android
- iOS
val testDomains = Mobileproxy.newListFromLines("www.youtube.com\ni.ytimg.com")
val strategiesConfig = "..."  // Config YAML.
val dialer = Mobileproxy.newSmartStreamDialer(testDomains, strategiesConfig, Mobileproxy.newStderrLogWriter())

// Use port zero to let the system pick an open port for you.
val proxy = Mobileproxy.runProxy("localhost:0", dialer)
// Configure your networking library using proxy.host() and proxy.port() or proxy.address().
// ...
// Stop running the proxy.
proxy.stop()
import Mobileproxy

var dialerError: NSError?
let testDomains = MobileproxyNewListFromLines("www.youtube.com\ni.ytimg.com")
let strategiesConfig = "..."  // Config YAML.
let dialer = MobileproxyNewSmartStreamDialer(
    testDomains,
    strategiesConfig,
    MobileproxyNewStderrLogWriter(),
    &dialerError
)

var proxyError: NSError?
// Use port zero to let the system pick an open port for you.
MobileproxyRunProxy("localhost:0", dialer, &proxyError)
// Configure your networking library using proxy.host() and proxy.port() or proxy.address().
// ...
// Stop running the proxy.
proxy.stop()
Schritt 3: HTTP-Clients und Netzwerk-Bibliotheken konfigurieren
Konfigurieren Sie Ihre Netzwerk-Bibliotheken so, dass sie die lokale Proxy-Adresse und den Proxy-Port verwenden.
- Dart/Flutter HttpClient
- OkHttp (Android)
- JVM (Java, Kotlin)
- Android Web View
- iOS Web View
Konfigurieren Sie den Proxy mit
HttpClient.findProxy.
HttpClient client = HttpClient();
client.findProxy = (Uri uri) {
  return "PROXY " + proxy.address();
};
Konfigurieren Sie den Proxy mit
OkHttpClient.Builder.proxy.
val proxyConfig = Proxy(Proxy.Type.HTTP, InetSocketAddress(proxy.host(), proxy.port()))
val client = OkHttpClient.Builder().proxy(proxyConfig).build()
Konfigurieren Sie den verwendeten Proxy mit den Systemeigenschaften:
System.setProperty("http.proxyHost", proxy.host())
System.setProperty("http.proxyPort", String.valueOf(proxy.port()))
System.setProperty("https.proxyHost", proxy.host())
System.setProperty("https.proxyPort", String.valueOf(proxy.port()))
Wenden Sie eine Proxy-Konfiguration auf alle Webansichten in Ihrer App mit der androidx.webview-Bibliothek an:
ProxyController.getInstance()
    .setProxyOverride(
        ProxyConfig.Builder()
            .addProxyRule(this.proxy!!.address())
            .build(),
        {}, // execution context for the following callback - do anything needed here once the proxy is applied, like refreshing web views
        {} // callback to be called once the ProxyConfig is applied
    )
Ab iOS 17 können Sie eine Proxy-Konfiguration zu einem WKWebView hinzufügen, indem sie die WKWebsiteDataStore-Eigenschaft nutzen:
let configuration = WKWebViewConfiguration()
let endpoint = NWEndpoint.hostPort(host: NWEndpoint.Host(proxyHost), port: NWEndpoint.Port(proxyPort)!)
let proxyConfig = ProxyConfiguration.init(httpCONNECTProxy: endpoint)
let websiteDataStore = WKWebsiteDataStore.default()
websiteDataStore.proxyConfigurations = [proxyConfig]
let webview = WKWebView(configuration: configuration)
Erweitert: Benutzerdefinierte Bibliothek für mobile Apps erstellen
Für erweiterte Anwendungsfälle können Sie eigene Bibliotheken für mobile Apps erstellen:
-
Go-Programmbibliothek erstellen: Entwickeln Sie ein Go-Paket, dass die erforderlichen SDK-Funktionen zusammenfasst.
-
Bibliotheken für mobile Apps erstellen: Verwenden Sie
gomobile bind, um Android-Archive (AAR) und Apple Frameworks zu erstellen. Beispiele: -
In Ihre App einbinden: Fügen Sie die erstellte Bibliothek zu Ihrer App hinzu.
Verwenden Sie gomobile bind in Ihrem benutzerdefinierten Paket, nicht direkt in den SDK-Paketen.